We often get asked how we host our WordPress websites. There’s a lot that goes into it, and it’s constantly being refined as we improve processes and assess new tools and services that become available.
So we wanted to share with you a rough outline of the tools we use and the way in which we setup a new WordPress sites.
Everyone has their preferred way of doing their work. We’re not saying this is the best way, but it’s our way, for the moment. It’s always adapting and improving, but as it stands today, this is the outline:
- Create a hosting server
- Install a server control panel
- Setup a WordPress site
- Configure LetsEncrypt SSL
- Setup email delivery
- Setup Shield Pro.
Let’s jump into each in some more detail.
#1 Create a VPS/Cloud Server using DigitalOcean
The biggest decision you’ll make for a WordPress site is the web hosting.
Choosing poorly here will impact every other aspect of your site, in particular site security and performance.
Our preferred approach of web hosting is with a DigitalOcean cloud server (a “Droplet”). There are a few reasons for choosing them:
- Cost. For only $5/month you get a mighty powerful little cloud server setup in just a few seconds.
- Ease of use. It’s incredibly easy to spin up a new cloud server and their control panel makes managing cloud servers painless.
- Performance. On one of our $5 cloud servers, we have 12 WordPress websites running. Each one of them is super fast and each runs incredibly smoothly. These little cloud servers have a lot of juice.
- Associated services. DigitalOcean comes with many other services within their infrastructure which are easily accessible if we ever need them to complement our sites, such a Space (just like AWS S3)
We can’t overstate how much we’ve come to rely on and actually get a little bit of pleasure when using DigitalOcean. They’re rock-solid reliable, and their support/community are fantastic.
At $5/month per server, and an optional $1/month for automatic server backups for disaster recovery, it’s hard to beat for all the reasons above.
Based on step #2, our server is installed with the latest Ubuntu OS. At the time of setting up the server, you’ll want to refer to the ServerPilot docs on the supported Ubuntu versions before creating a new VPS.
#2 Server Control Panel using ServerPilot
If the cloud server is newly commissioned, you’ll want a control panel that does most of the heavy lifting for you.
Sure, you could install and configure PHP, MySQL and all the other bits yourself, but we prefer to have it all done for us automatically.
The are many options for server control panels now, including the grandaddy of them all, cPanel. But the one we prefer, ServerPilot, has great pricing with simple server management without reaching into everything.
The pricing is quite reasonable, and at the time of writing it’s:
- $5 / server
- +$0.5 / site (or “App” as they call it)
Taking our example above of 12 WP sites running on a single DigitalOcean server, this works out at ~$16/month. That’s just over $1/month to host each site on a fast and secure platform.
Here’s 1 of these simple sites, as an example of quickly they run: Fernleaf Systems
With ServerPilot, each site is contained within its own system user, reducing the risk of cross-site contamination, if any 1 site is compromised.
#3 Setup The New WordPress Site Using ServerPilot
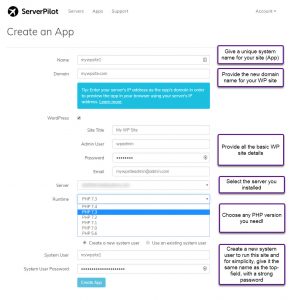
Once you’ve setup the ServerPilot control panel on a server, you can immediately start adding new sites – and they even have an automatic installation option for WordPress sites. It’ll automatically create your MySQL databases, too.
See the screenshot below on how we go about creating a new WP site.
If you follow these steps, you’ll have a brand new WordPress site in a few seconds.
#4 Configure Automatic SSL using LetsEncrypt
Gone are the days of paying for ridiculously expensive SSL certificates and struggling through the convoluted process of installing them.
ServerPilot, as with most control panels now, automates all of this.
This is how to ensure it works correctly and automatically installs the LetsEncrypt certificate:
Step 1: Update the DNS for the website URL to ensure it’s pointing to your server.
Important: If you’re using CloudFlare, you must disable the orange cloud proxy setting for this site domain.
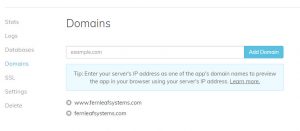
Step 2: Ensure ServerPilot has your full list of domain names configured for your site.

Step 3: Click to enable AutoSSL in ServerPilot (if it’s not already enabled).

Wait a minute or so and refresh the page. As shown above, your domain names will appear in your AutoSSL certificate.
Important: If in step 1 you turned off the CloudFlare proxy for the particular DNS entries, turn it back on after the AutoSSL setup is done.
#5 Configure Email Delivery using Postmark
We’ve discussed at length the problems of relying on WordPress sites to reliably send emails. If email delivery is important, you should always use a dedicated service to handle this.
We use Postmark, as it is super simple to setup any new domain for sending emails.
#6 Install and Configure Shield Security Pro for WordPress
We install Shield immediately and configure the standard security settings we want by importing them from another site, or using one of our security profiles within iControlWP.
Of course, with 2-factor authentication by email, we had to ensure Item #5 was completed first. After that, we’re off to the races!
And We’re Done!
It really is simple to setup fast, secure WordPress sites.
Of course, if you only have 1 WordPress site to host and manage, this probably isn’t necessary and you may be better off just buying a shared-hosting package.
If you’ve more than a few sites to manage, and you need reliability and performance out-of-the-box, this is one of the easiest ways to go about it.
This is how we run most of our WordPress websites, as well as most other sites we need. Everyone has their unique way of going about setting up a site, of course. How do you do it? Do you have services you use that you love too much to leave behind? Is there any particular server control panel you prefer, or do you like it with a bit more DIY?
Please share with us, and all the readers, the tools and services you use and also your thoughts on what we’ve written about here.
Note: some of the links above are affiliate links, such a DigitalOcean/ServerPilot. We only ever use such links with goods and services we use and whole-heartedly recommend.
Hello dear reader!
If you want to level-up your WordPress security with ShieldPRO, click to get started today. (risk-free, with our no-quibble 14-day satisfaction promise!)
You'll get all PRO features, including AI Malware Scanning, WP Config File Protection, Plugin and Theme File Guard, import/export, exclusive customer support, and much, much more.
We'd be honoured to have you as a member, and look forward to serving you during your journey towards powerful, WordPress security.
ShieldPRO Testimonials
Comments (5)
Leave a Comment
Main Sections
- #1 Create a VPS/Cloud Server using DigitalOcean
- #2 Server Control Panel using ServerPilot
- #3 Setup The New WordPress Site Using ServerPilot
- #4 Configure Automatic SSL using LetsEncrypt
- #5 Configure Email Delivery using Postmark
- #6 Install and Configure Shield Security Pro for WordPress
- And We’re Done!


Holy s**t!
The best marketing email that I’ve ever read. I’ll be following this on my next website install.
BTW – Shield Security totally rocks!
Thank you,
Randy M.
Thanks a lot to sharing those ideas !
Thx a lot for providing many years great tool!!! And I am keeping my finger crossed to be the same great and “free” tool in the future.
You do incredible work to secure WP sites world-wide and secure Internet from infected WP’s BotNets.
My way to host WP:
Odroid H2/or Scaleway VPS + ubuntu 18.04 LTS + nginx proxy with HTTPS tunneling support and external IP forwarding + Let’s Crypt with certbot runs by cron + LXD containers + of course ShieldSecurity Plugin + external backups to Minio with Minio-CLI every night.
Now I am working to move my all WP sites to Docker+Traefik on Alpine OS platform + ShieldSecurity WP Plugin on duty of course 🙂
Best Regards from Gdańsk (POLAND)
and Take Care!
I use Cloudways for hosting and Hover for domain registration/ email services. For my small business clients Hover mail is a GREAT alternative and easy to configure at sites and the price point is awesome.
I love your plugin. I run it on all of my clients’ sites. It’s a mandatory staple in all the builds I do.
Keep up the good work and the great price point for clients who are on the lower end of revenue.
Hi! Almost the same setup as ours… But one thing is different. In stead of ServerPilot I use Runcloud. Much better in my opinion. Thanks for sharing!
Regards,
Norman